Worflow: onboard an ongoing study to IDEAL by importing a patient list
Create a new study
To create a new study, select “Studies” on the sidebar navigation, and then “Create Study”.
Here you can name your study, select an acronym and add a short description for your study.
Note
The items detailed with “*” are mandatory when creating a study.
A test study named “Test01” was created here as an example, as shown below.

Please select the:
“Authorized users”, who will be able to edit and manage patients from a study, but will not be able to edit the study.
“Local responsible operators”, who will be able to manage users and edit the study. “Local responsible operators” can also manage patients.

Note
To select multiple users, please use the CTRL + left click button.
You can now click to save and create your study. Your study can now be seen in the “Studies” area, as seen below:

Now, your study needs to be approved by the Superuser. Check the next section to understand how to Approve a new study.
Approve a new study
When logged in as Superuser, you will find the study to be approved in your “Dashboard”:

Click on the “✓” to approve the study. Your study is then approved.
Warning
Only the IDEAL Superuser can approve the study. Until then, it is not possible to either import or add patients to the study.
Define the data format of a study
Before importing the patients of your study, you need to check the study details. For this click on the eye icon on the bar:

Here you will have access to the “Study metadata” and “My Study Data Format”. This last section is especially important before the bulk import of the patient data from your study, as it allows to match the format of your study data (column names, date format, etc) to the format IDEAL “expects”. The format of your data will be “Source” and what IDEAL “expects” would be “IDEAL representation*”.
Warning
To bulk import patients, IDEAL only supports .CSV files at the moment. Most programs (for example MS Excel) supports conversion into a .CSV format.
Let’s take this dummy file as an example:

It contains the information of 3 “patients”. This is a CSV file with the follwing columns:
StudyPatientID: patient identification number
FirstName: first name of the patient
LastName: surname of the patient
DOB: date of birth
Gender: gender
DOE: date of enrollment
E: whether the patient is enrolled
Warning
Disclaimer: these “patients” are fake “patients”, who were created to explain this section and are not enrolled, as far as we know, in any kind of real study.
Let’s go step by step, taking the above data as example. In IDEAL, in the “My Study Data Format”, you can see the following fields:
- “CSV delimiter”: here choose what is the separator used on your file
our study is already separated by “,” - no change required
- “CSV quotation mark”: here choose the appropriate quotation mark
our study is already separated by “,” - no change required
- “Date format”: default is set to %Y-%m-%d (format specifier). This means that IDEAL expects the date in the following format: YYYY-mm-dd (for example: 2023-08-01).
our data has a different date format: dd.mm.YYYY (or %d.%m.%Y) - this needs to be updated
- “Gender representation”: IDEAL representation of Female is defined by “F”, Male by “M” and “Unknown” to “O”. Here the source default is pre-set to “Female”, “Male”, “Unknown”, respectively to the IDEAL representation.
in our study, the gender is also set to “F” and “M” - this needs to be updated. This file is too short to understand how “Unknown” is set to, so we will set it as U for now.
- “Boolean representation”: here IDEAL expects the value True/False, while the source default is set to Ja/Nein/Unknown,
in our study, the boolean values for enrolled are also described as True/False - this needs to be updated
- “Column mapping”: here we need to match the names of our columns to the IDEAL representation. Here the default source columns need to be updated to match the names of our columns, as they are currently set to the same as the IDEAL representation:
study_patient_id
first_name
last_name
date_of_birth
gender
date_of_enrollment
enrolled
After the updates mentioned above, “My Study Data Format” looks like this:

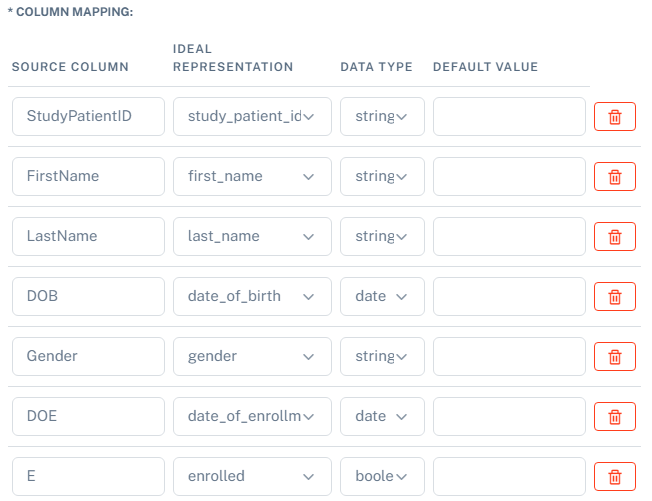
Your study format has been set and you can “Save”.
Note
You will need to specify the study format before importing the patient data. You can also format your data to match the default IDEAL.
Warning
If a mismatch between the source (your study) and IDEAL formats occurs, the patient bulk import to IDEAL will fail.
Warning
Every time a new study is created, the source will reset to the default mentioned above. Therefore, every time a new study is created, the Study data format will have to be specified.
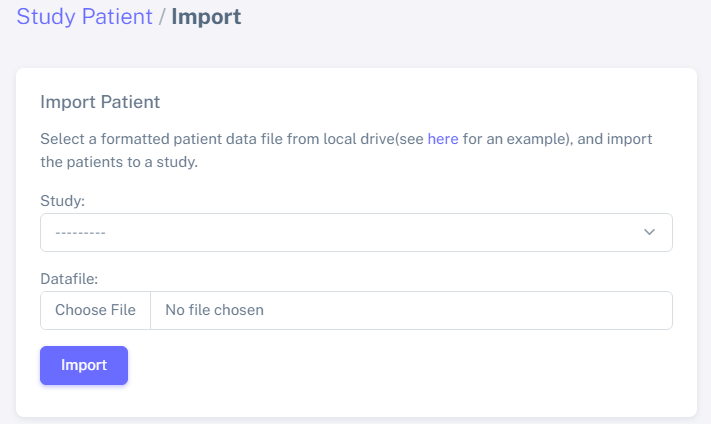
Import a list of patients from a CSV file
To import a list of patients from an ongoing study, select “Import” in the “Patients” area:
Warning
Before importing the list of patients, first make sure you are trying to import a .CSV file and that this file follows the data format defined on IDEAL (see above how to do this).
Here, select the study you want to import patients to and select the CSV file which contains the Study patients.
Your Study patients will be automatically linked and matched to the Hospital database!
Check the section IDEAL linkage to understand more about the linkage process on IDEAL and how to further manage the patients in your study!
Warning
Confirm the format and the name of your columns matches the format expected by IDEAL!
Matching between imported patient list and carecenter
Matching between the imported patient list and the carecenter can be done in 2 ways:
Matching by Hospital ID
Matching by patient name and date of birth
Warning
if both Hospital ID and patient name + DOB are present, the matching is done by Hospital ID.
Input/output uses cases and warnings
The patient list should be checked for repeated entries before importing them in IDEAL. In the future we plan to develop a check which prevents these situations, but currently be aware that:
Patients with the same Study ID, but different Hospital IDs: only the last patient of the list is imported, remaining are overwritten.
Patients with the same Hospital ID, but different Study IDs: both patients are imported, but only the first patient is matched to the Hospital ID.